


You open the dishwasher after a full cycle and find dirty water pooled beneath the lower rack. In many homes, that kind of problem points to a short list of common causes: drainage restrictions, poor water supply, clogged filters, leaks, or a control issue. To fix a dishwasher, start with the simple checks in the right order so you can rule out easy problems before assuming a major part has failed.
Some dishwasher issues can be corrected with basic troubleshooting, such as cleaning the filter, checking the drain hose, or confirming that the water supply is fully open. Others, especially those involving wiring, motors, control boards, or active leaks near electrical parts, are better handled by a licensed professional. Many of these symptoms also overlap with commonn plumbing problems, especially when drainage restrictions or water supply issues are involved. Repair-center findings also show that pumps, electronics, inlet valves, foreign-object blockages, and door mechanisms are among recurring failure points (peer-reviewed repair-center study).
This guide walks through a practical troubleshooting sequence, explains what common dishwasher problems usually mean, and helps you decide when DIY work is reasonable and when to stop. Along the way, it also covers the plumbing connections that often affect dishwasher performance, especially the water supply line, drain hose, sink connection, and garbage disposal tie-in.
How Do I Diagnose a Dishwasher Problem?
Diagnose the symptom before replacing a part. Start by identifying exactly what the dishwasher is doing wrong. A machine that will not start requires a different approach from one that runs but leaves standing water, leaks onto the floor, or fails to clean dishes properly.
Use this step-by-step process before touching internal parts:
- Record the fault clearly: Note when the problem started, whether water remains in the tub, whether the control panel powers on, and whether any lights are blinking.
- Write down the model number: Find it on the inner edge of the door so you can match instructions and error codes to the correct unit.
- Document codes and light patterns: Do this before resetting the machine, because a reset may erase useful evidence.
- Check the surrounding plumbing: See whether the sink drains normally and whether the garbage disposal or sink connection may be contributing to the problem.
- Listen to the machine: A hum during drain, a grinding noise, or repeated stopping can point you toward a blockage, a pump issue, or a control fault.
This kind of fault snapshot saves time and helps you avoid replacing the wrong part. It also helps if you later need to arrange a broader plumbing inspection, because a clear record gives a technician a stronger starting point.
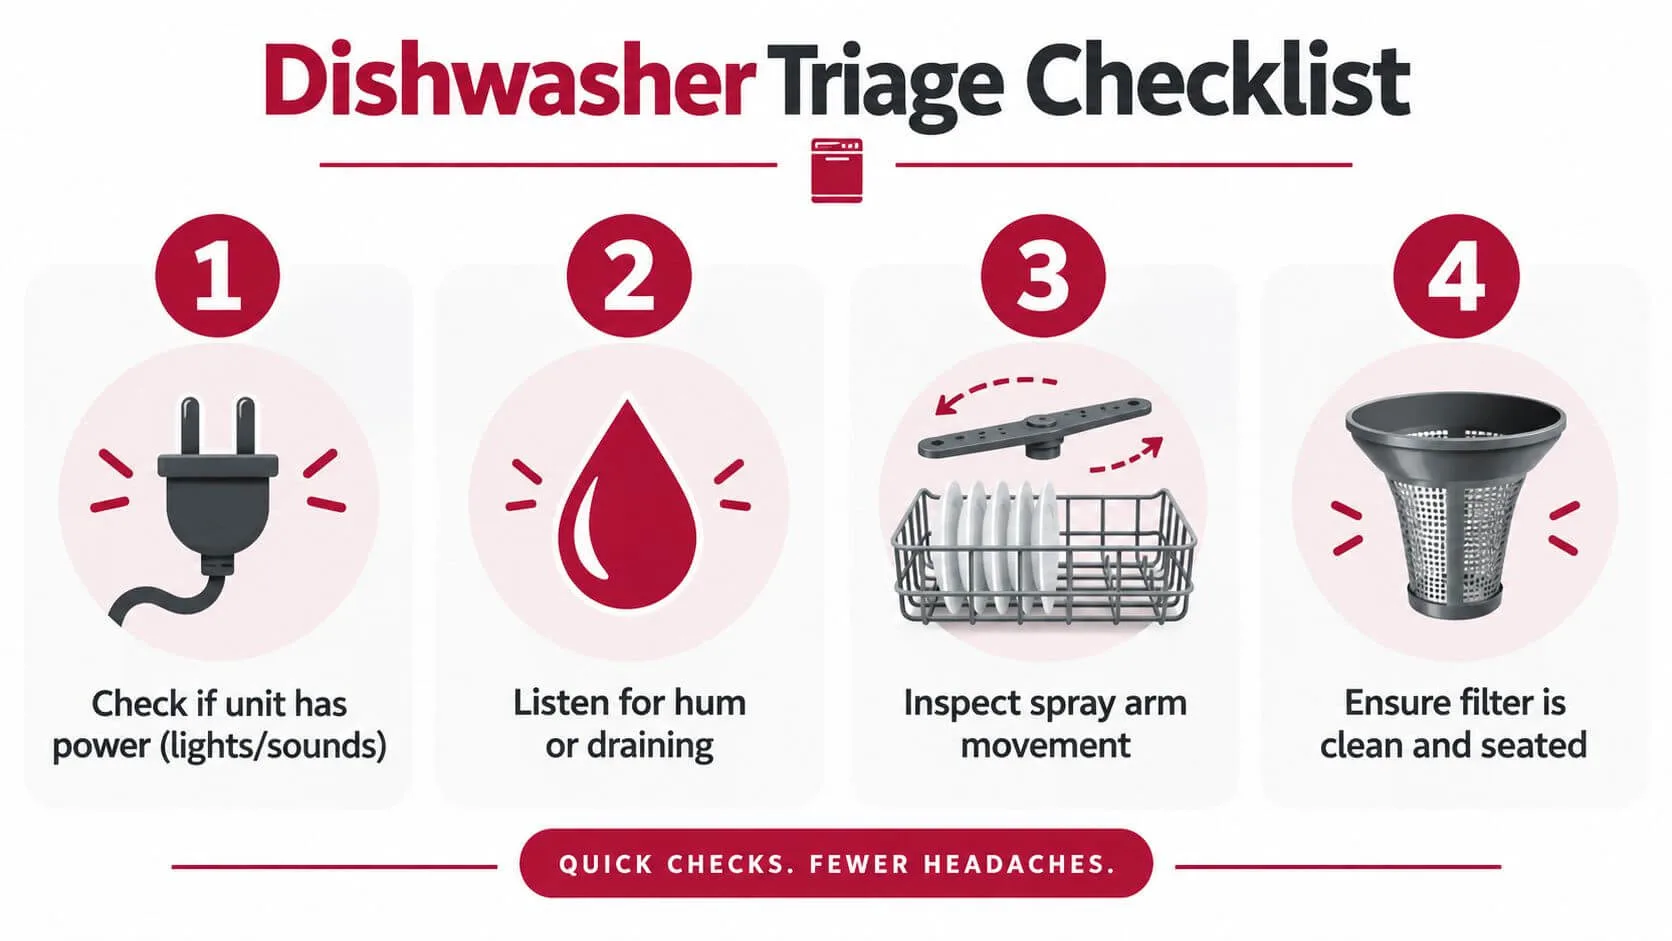
Before beginning any hands-on troubleshooting, disconnect power at the dishwasher breaker, confirm the controls are dead, remove standing water with a cup and towels, and keep the surrounding area dry. Dishwasher safety guidance consistently advises disconnecting power and removing water first because the appliance may contain hot water and live electrical components (Bosch safety guidance).
1. Check the Power Supply
Check whether the dishwasher is receiving power at all. Look at the control panel, confirm the breaker has not tripped, check any nearby GFCI outlet, and verify that a wall switch has not been turned off if your dishwasher is wired that way.
To perform this check safely, keep the dishwasher dry inside and out before touching switches or outlets. Reset a tripped breaker or GFCI once, then test the appliance. If the breaker trips again, stop there and do not keep resetting it.
This matters because a dishwasher cannot start, fill, or drain properly if the control system is not receiving stable power. A dark panel, interrupted cycle, or unresponsive buttons often begin here.
If power is restored and the dishwasher starts normally, the issue was likely external to the appliance. If the panel remains dead or the breaker keeps tripping, the result points toward wiring, a latch-switch problem, a fuse, or a control fault that requires professional diagnosis.
2. Inspect the Water Supply
Check the dishwasher shutoff valve, inlet hose, and any visible signs of restricted flow. The shutoff valve is usually beneath the sink, and the inlet hose should be free of kinks, crushing, or loosened connections.
To do this safely, turn off power first, then visually inspect the hose route and confirm the valve is fully open. If your model allows access to the inlet screen, inspect it for sediment buildup without forcing any sealed parts apart.
This matters because the dishwasher depends on steady water flow to fill to the correct level. A restricted water supply can cause poor cleaning, weak spray action, incomplete cycles, or fill-related fault codes. Water-supply guidance commonly places the shutoff valve, hose, and inlet components among the first checks (dishwasher troubleshooting reference).
If opening the valve or correcting a kink improves performance, the problem was likely inadequate water delivery. If the unit still fills weakly or not at all, the result may indicate a faulty inlet valve, low supply pressure, or a supply-line issue that needs further testing.
3. Clean the Dishwasher Filter
Check the filter and sump area for grease, food debris, labels, glass, or other foreign objects. Most dishwashers allow you to remove the lower rack and unlock the filter by hand.
To perform the check safely, disconnect power, remove standing water if needed, and follow the filter markings or model instructions. Rinse the filter under hot water, brush away buildup, inspect the sump basket carefully, and reinstall the filter securely.
This matters because a blocked filter restricts the path between the tub and the drain system. That can lead to standing water, poor cleaning, odors, and repeat drainage complaints.
If drainage and cleaning improve after the filter is cleaned, the blockage was likely the root issue. If water remains afterward, continue troubleshooting the drain path rather than jumping straight to pump replacement.
4. Check the Drain Hose
Check the drain hose beneath the sink and, where accessible, behind the dishwasher. Look for kinks, twists, cracks, sagging sections, or visible clogs. Also confirm that the hose follows the correct route, including a high loop or air gap if required by the installation.
To do this safely, keep power disconnected and inspect only accessible hose sections. Do not pull the dishwasher out aggressively if the water line or wiring may be strained.
This matters because the drain hose carries wastewater out of the machine. If it is blocked or routed poorly, the pump may run but the dishwasher will still hold dirty water.
If straightening the hose or clearing an accessible obstruction restores flow, the hose was likely the problem. If the hose appears clear but the dishwasher still does not drain, the result points to the sink connection, disposal entry, shared plumbing, or the drain pump itself.
5. Clear the Garbage Disposal Connection
Check the point where the dishwasher drain hose connects to the sink drain or garbage disposal. If a new disposal was installed recently, the dishwasher inlet knockout plug may still be in place, blocking drainage.
To perform this safely, disconnect power to the dishwasher and make sure the garbage disposal cannot turn on while you inspect the connection. Never place your hand inside the disposal. Check only the exterior hose connection and the accessible inlet point.
This matters because dishwasher drainage often depends on a shared plumbing path through the sink or disposal. A blockage or missed knockout plug can make the dishwasher look like it has a failed pump when the real problem is in the sink-side connection.
If clearing the disposal connection or removing an accessible blockage restores drainage, the dishwasher itself may be fine. If the sink also drains slowly, the result suggests a broader plumbing restriction. Use appropriate drain-cleaning guidance before attempting more invasive work, including this practical guide to using a drain snake.
6. Inspect the Spray Arms
Check the spray arms for blocked nozzle holes, food particles, mineral buildup, or restricted movement. Remove them if the manual permits it, then rinse and inspect each arm carefully.
To do this safely, disconnect power, remove the racks as needed, and clear the jets with a soft brush or fine pin without enlarging the openings. Spin each arm by hand after reinstalling it to make sure it moves freely.
This matters because the spray arms distribute wash water throughout the tub. If they are blocked or cannot rotate properly, dishes may come out dirty even when the dishwasher fills and drains normally.
If cleaning the spray arms improves results, the issue was likely poor water distribution rather than a failed major component. If cleaning does not help and the dishwasher fills correctly, the result may indicate a circulation problem or an internal obstruction.
7. Check for Leaks
Check the door gasket, latch area, inlet and drain hose connections, and the floor or cabinet base around the dishwasher. Look for moisture, residue trails, warped seals, or signs that water is escaping during a cycle.
To perform this safely, wipe the area dry first, then inspect visible connections and the door seal with power off. If you see active leaking under the cabinet, stop using the appliance and close the dishwasher water shutoff valve.
This matters because leaks can damage cabinets, flooring, insulation, and nearby electrical components. Even a small leak can indicate a worn gasket, poor door alignment, a loose hose connection, or water collecting in the base.
If cleaning the gasket or correcting a minor visible connection solves the problem, the leak may have been a simple maintenance issue. If water is collecting beneath the machine, the base is wet, or the tub or seal appears damaged, the result indicates a repair that should be handled professionally.
8. Reset the Dishwasher
Check the model-specific reset procedure in the manual or service sheet before trying random button combinations. Many dishwashers reset by holding the Start button for 10 to 15 seconds, while others require the power to be disconnected for about five minutes.
To do this safely, use only the manufacturer-approved reset method. Do not continue repeating resets if the appliance immediately returns the same fault.
This matters because a reset can clear a temporary control glitch, but it cannot remove a clog, restore water pressure, or repair a damaged electrical component.
If the dishwasher runs normally through a complete cycle after the reset, monitor it through at least two full cycles. If the same code or symptom returns, the result confirms that the underlying problem still exists and further diagnosis is needed.
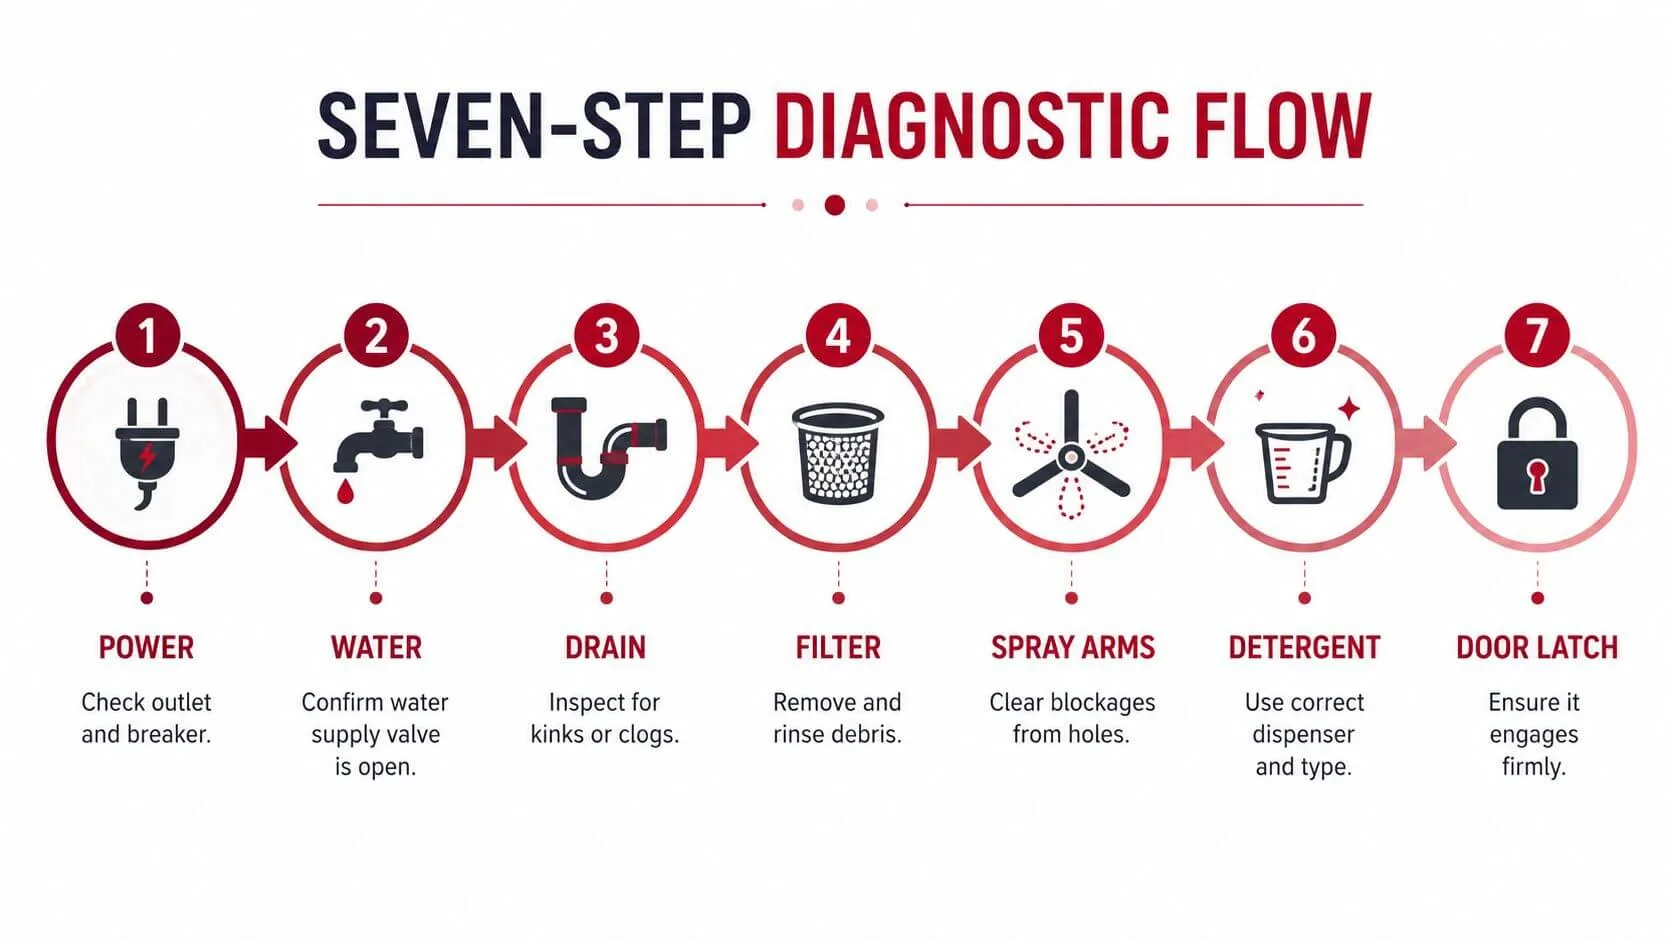
This short video provides a visual complement to the sequence above:
What Are Common Dishwasher Problems?
Common dishwasher problems include:
- Leaks: Often linked to door gaskets, hose connections, tub damage, or poor door alignment.
- Poor drainage: Commonly caused by clogged filters, blocked drain hoses, sink-side restrictions, or pump issues.
- Failure to fill: Often tied to a closed shutoff valve, kinked inlet hose, low water pressure, or a faulty inlet valve.
- Low water pressure: Can reduce fill level and weaken spray performance, leading to poor cleaning.
- Unusual noises: Grinding, humming, or rattling can indicate foreign objects, pump trouble, or restricted moving parts.
- Poor cleaning: Blocked spray arms, filter buildup, detergent residue, and water-quality issues often contribute.
- Control issues: A dead panel, blinking lights, or recurring error codes may point to power, latch, wiring, or control faults.
Consumer-reported repair data highlights how often these categories appear in real homes. Reported issues include failure to clean properly at 11%, failure to dry at 9%, failure to drain at 7%, control-panel failure at 7%, and leaking at 6% (Consumer Reports appliance repair data).
| Symptom | Likely cause | Consumer-reported share | Fix outcome |
|---|---|---|---|
| Won’t clean properly | Blocked spray arms, filter buildup, detergent or hard-water residue | 11% | Cleaning and loading corrections may restore washing; circulation faults need testing |
| Won’t dry properly | Heating, rinse-aid, cycle, or sensor-related issue | 9% | Confirm settings and rinse aid before testing heater components |
| Won’t drain properly | Filter, food debris, grease, hose, disposal connection, or pump | 7% | Clear accessible restrictions first; pump faults need a technician |
| Control panel fails | Power, latch, wiring, or control component | 7% | Verify power and latch; recurring control faults require diagnosis |
| Leaks | Gasket, hose connection, tub, float, or door alignment | 6% | Clean and inspect the seal; base leaks need prompt professional attention |
Noisy operation adds another useful clue. A foreign object in the sump suggests a different repair path from a worn impeller or failing pump, so the sound pattern matters.
How Does Your Dishwasher’s Water Supply System Impact Its Performance?
The Water Supply System directly affects how well a dishwasher fills, sprays, cleans, and completes a cycle. If the water supply valve is partly closed, the inlet hose is kinked or restricted, or household water pressure is too low, the dishwasher may underfill. That reduces spray force, leaves detergent behind, and can lead to weak cleaning or interrupted cycles.
The water supply valve under the sink controls how much water reaches the appliance. The inlet hose carries that water to the dishwasher, so any kink, crushing, or buildup can restrict flow. Water pressure matters because the dishwasher needs enough incoming force to fill on time and support normal wash performance.
Common signs of a restricted Water Supply System include dirty dishes after a normal cycle, weak spray action, low or no fill, long pauses, fill-related fault codes, or a humming inlet valve with little water entering the tub. Poor cleaning can also be affected by hard water scale, detergent choice, and soil-sensor behavior in efficient machines. ENERGY STAR materials describe soil sensors and improved water-use features, while Department of Energy data records a reduction of more than 56% in average dishwasher energy use per cycle from 1990 to 2018 (ENERGY STAR dishwasher messaging). If low pressure affects more than just the dishwasher, investigate low water pressure in the house instead of replacing the inlet valve too quickly.
Is Your Dishwasher Getting Enough Water Supply to Clean Properly?
No, if your dishwasher shows signs like weak spray, incomplete filling, detergent left behind, or consistently poor cleaning, it may not be getting enough water supply to clean properly. Those symptoms often point to restricted flow, a partially closed shutoff valve, a kinked inlet hose, or low household water pressure.
A dishwasher that gets enough water should fill to the correct level for the wash system to circulate water forcefully through the spray arms. If the water level is too low, the machine may still run, but cleaning performance will suffer.
The result matters because this symptom can look like a circulation or detergent problem when the real issue is supply-related. Start with the valve and hose, then consider pressure or inlet-valve testing if the problem continues.
What Causes Drainage System Clogs in a Dishwasher?
Common causes of dishwasher drainage clogs include:
- Food debris: Bits of food can collect in the filter, sump, or drain path and slow water flow.
- Grease buildup: Greasy residue can coat the filter, hose, and sink-side connection over time.
- Clogged filters: A dirty filter restricts the movement of water out of the tub.
- Blocked drain hoses: Kinks, sags, and internal buildup can trap wastewater.
- Garbage disposal connection problems: A blocked disposal inlet or missed knockout plug can stop drainage completely.
- Sink plumbing restrictions: A slow sink drain can back up the shared drainage route used by the dishwasher.
Dishwasher drainage typically connects to the sink drain or garbage disposal, often using a high loop or air gap to protect against backflow. That means the dishwasher's drainage system is not isolated. A clog in the sink-side plumbing can create symptoms that seem like an appliance failure when the real restriction is farther downstream.
How Do You Clear Clogs Between the Dishwasher Drain and the Sink Plumbing?
To clear clogs between the dishwasher drain and the sink plumbing, follow these steps below.
Use these safe steps:
- Disconnect power to the dishwasher.
- Inspect the drain hose connection under the sink for buildup, kinks, or obvious blockage.
- Check the garbage disposal inlet if one is present, especially if the disposal was installed recently.
- Confirm the high loop or air gap is intact and not blocked.
- Run the sink and observe drainage to see whether the problem may be in the shared plumbing rather than the dishwasher.
- Clear only accessible blockages without forcing tools into hidden appliance components.
This process helps you identify whether the restriction is in the dishwasher hose, the disposal entry, or the sink drain itself. If the clog extends into the household drain line, use appropriate guidance before doing more, including this practical guide to using a drain snake.
How Do You Troubleshoot the Plumbing System Connected to a Dishwasher?
Troubleshoot the plumbing system in the same order the water moves through it.
- Check the water supply line: Make sure the line is not kinked, crushed, or leaking.
- Confirm the shutoff valve is fully open: A partly closed valve can cause weak filling and poor cleaning.
- Inspect the drain hose: Look for kinks, clogs, cracks, or sagging sections.
- Check the sink or disposal connection: Make sure the connection is clear and properly attached.
- Look for leaks around fittings and the cabinet base: Moisture trails often reveal a loose connection or failing seal.
- Test whether the sink drains normally: A slow sink can indicate a shared drainage problem.
This method distinguishes dishwasher-related problems from plumbing issues, particularly when the dishwasher hums during draining, fills inadequately, or leaks under the cabinet. Seeking professional plumbing service may be necessary instead of appliance repair if a larger water or drainage problem is identified outside the dishwasher. A documented system check can also assist if you need to arrange a plumbing inspection.
Can I Repair My Dishwasher Myself?
Yes, but it depends. You can repair a dishwasher yourself when the work stays within accessible cleaning, inspection, and simple part checks. Tasks like cleaning the filter, inspecting visible hoses, clearing spray-arm blockages, and performing a single reset are reasonable for many homeowners.
DIY repair becomes a poor choice when the problem involves active leaks under the cabinet, hidden plumbing, internal electrical testing, control boards, motors, heating elements, or sealed water-path components. Those jobs carry higher risk and often require model-specific disassembly and testing.
A good rule is simple: if you can safely access the part without exposing live wiring or opening sealed assemblies, it may be a DIY task. If not, stop and move to professional help.
When Should You DIY vs. When Should You Call a Professional?
Use DIY troubleshooting for accessible, low-risk tasks. Call a professional when the repair involves electrical hazards, internal components, recurring faults, or active water damage.
| Situation | DIY | Professional |
|---|---|---|
| Clean filter and spray arms | Yes | Not usually needed |
| Inspect accessible drain hose | Yes | If blockage is hidden or hose access is difficult |
| Confirm power, breaker, GFCI, and shutoff valve | Yes | If breaker keeps tripping or wiring is suspect |
| Reset the dishwasher once | Yes | If the same code returns repeatedly |
| Minor visible gasket cleaning | Yes | If gasket is damaged or leak persists |
| Replace or test control board | No | Yes |
| Diagnose internal motor or heater fault | No | Yes |
| Repair active leak under cabinet base | No | Yes |
| Work on hidden plumbing or sealed components | No | Yes |
If you are unsure whether the problem has crossed that line, call a plumber rather than continuing trial-and-error repairs.
Is It Worth Paying Someone to Fix a Dishwasher?
Yes, paying someone to fix a dishwasher is often worth it when the problem is limited, the machine is otherwise in good condition, and the repair cost is reasonable. Issues like a clogged drain path, worn latch, hose problem, or gasket leak may justify a service call, especially if you want qualified plumbing services to confirm whether the fault is in the appliance, the drain connection, or the water supply line.
How Can Routine Maintenance Prevent Future Breakdowns?
Routine maintenance prevents many dishwasher breakdowns by protecting water flow, drainage, sealing, and spray performance before small issues become major repairs. Cleaning filters, checking hoses, and inspecting visible connections help stop the same problems that appear again and again in service calls.
Regular maintenance works because it removes debris before it clogs the drain path, catches hose routing problems before they become leaks, and keeps spray arms and seals functioning correctly. Proper loading, suitable detergent, and attention to water conditions also reduce repeat complaints about poor cleaning and residue.
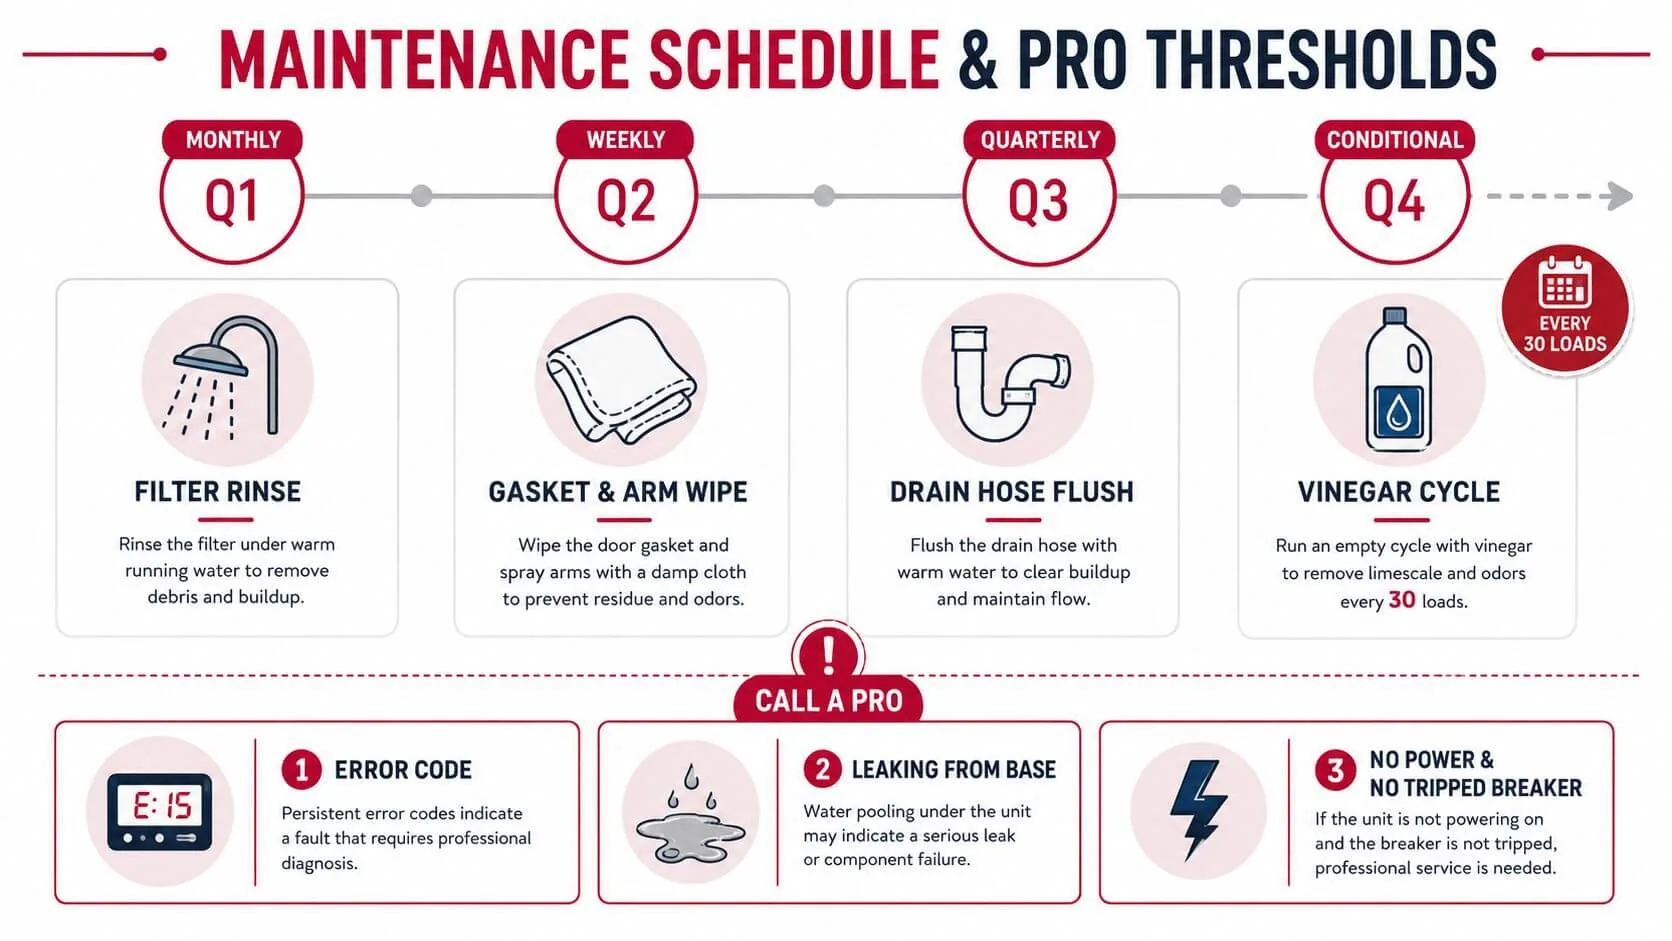
A simple maintenance plan includes:
- Clean the filter monthly: Remove grease and food debris under hot running water.
- Wipe the gasket and inspect spray arms weekly: Remove residue and clear blocked arm holes.
- Check the hose and sink connection quarterly: Look for buildup, kinks, or restricted drainage.
- Use detergent suited to your water conditions: Hard water and excessive detergent both cause performance issues.
- Run a vinegar cycle periodically if the manufacturer allows it: This can help reduce detergent and limescale buildup. Never mix vinegar with bleach.
How Do Dishwasher Repairs Differ in Residential vs. Commercial Plumbing?
Residential and commercial dishwasher repairs differ mainly in water demand, drainage capacity, installation complexity, and usage frequency. A homeowner usually troubleshoots one appliance tied into standard household plumbing. A commercial operator may be dealing with dedicated drains, higher throughput, stricter sanitation requirements, and equipment that runs repeatedly throughout the day.
| Factor | Residential | Commercial |
|---|---|---|
| Water demand | Household cycle demand | Higher throughput demand tied to racks and operating schedule |
| Drainage capacity | Sink, air gap, disposal, or household standpipe connection | Dedicated drain arrangements and larger drainage requirements |
| Installation | Standard kitchen water, drain, and electrical connections | More complex plumbing, electrical, ventilation, and code coordination |
| Usage frequency | Intermittent household use | Repeated cycles in restaurants, offices, and retail food areas |
| Repair threshold | Basic accessible checks may be appropriate | Specialist service is usually the safer choice |
Commercial machines may also involve booster heaters, wash-arm wear, solenoids, door springs, and sanitization compliance checks. Those parts interact with the building's water and electrical systems, so the troubleshooting process is broader than it is in a typical home kitchen.
Do Commercial Dishwasher Plumbing Repairs Require Specialized Tools?
Yes. Commercial dishwasher plumbing repairs often require specialized tools because the systems are larger, more heavily used, and more tightly tied to building infrastructure than residential units.
Repairing a dishwasher in a commercial setting may involve pressure testing, temperature verification, electrical checks, flow measurement, sanitation compliance, and model-specific service tools. It also often requires a technician who understands the installation standards for food-service equipment.
That does not mean every issue is complex. Basic visible checks still matter. However, once the problem affects drainage capacity, heating performance, throughput, or sanitation, specialist service is usually the safer and more practical route.