

Kitchen sink installation involves fitting and securing the sink, connecting the faucet and water supply lines, connecting the drain and P-trap, sealing the required joints, and testing the completed installation for leaks. Before installation, confirm that the sink matches the countertop opening, cabinet space, drain position, faucet layout, and mounting requirements.
The installation sequence is: measure and verify the fit, gather the required tools and materials, shut off the water and power, remove the old sink, prepare the opening, install the faucet and drain components, secure and seal the new sink, connect the drain and supply lines, and test every connection for leaks.
Methods differ significantly between drop-in or top-mount, undermount, and farmhouse or apron-front sinks. A like-for-like replacement can be manageable for a careful homeowner, while a changed cutout, altered drain location, stone countertop modification, or new support system calls for professional coordination.
What Type of Kitchen Sink Should You Choose and Will It Fit Your Opening
Choose a kitchen sink that matches your countertop opening, cabinet dimensions, drain position, faucet configuration, and required mounting method. The three primary installation types are drop-in, undermount, and farmhouse sinks. Verify the manufacturer’s cutout template before removing the existing sink or modifying the countertop.
Compare the three mounting styles
A drop-in or top-mount sink sits on the countertop, with its rim covering the cutout. That rim makes this style more forgiving for many replacements, but the opening still must match the sink's template. One manufacturer's guide lists a 24-1/4-inch by 21-1/4-inch cutout for a 25-by-22-inch sink, while several 33-by-22-inch models require a 32-1/4-inch by 21-1/4-inch cutout. Check the model-specific dimensions in this drop-in sink installation guide.
An undermount sink fastens beneath the countertop. The exposed countertop edge becomes the finished rim, so the cutout must be accurately shaped, smooth, and properly supported. Allow for the sink's weight, mounting clips or brackets, adhesive or sealant, and the manufacturer's curing requirements. This installation has less tolerance for an incorrect opening than a drop-in replacement.
A farmhouse or apron-front sink requires cabinet work because the apron occupies the cabinet face. The cabinet must carry the basin, provide enough depth, and leave room for the drain and trap. Countertop and cabinet changes make this style more involved than a standard replacement.
Measure the actual fit before buying
Measure for a new kitchen sink by checking the existing countertop opening at several points and comparing those measurements with the manufacturer’s cutout template. Overall sink dimensions are not enough. A product guide for a 33-by-22-inch top-mount sink specifies a 32-3/8-inch by 21-3/8-inch cutout with a 1-1/2-inch corner radius, which shows why the supplied template controls the installation. Use the top-mount sink measurement guide for the exact model.
Check the following before ordering:
Opening dimensions: Verify length, width, corner shape, and finished countertop thickness.
Cabinet clearance: Measure bowl depth and check disposal space, dishwasher connections, tailpiece position, and room for the P-trap.
Drain location: Compare the new drain outlet with the existing wall drain and trap arm. A shifted drain can require more rework than a different basin width.
Faucet layout: Kitchen faucet holes commonly use 4-inch or 8-inch center-to-center spacing. Match the faucet to the drilled layout using this kitchen faucet hole-spacing guide.
Basin dimensions: Common kitchen sinks are often around 22 inches by 30 inches, with bowl depths of 7 to 10 inches. Review these common kitchen sink bowl dimensions, then verify the specific product template.
If the template does not fit, stop before cutting or sealing. Countertop cutting, stone drilling, cabinet alteration, and undermount support require careful coordination. Confirm that the sink will sit level, rest on the intended support, and leave the drain and faucet aligned before making permanent connections.
What Tools and Materials Do You Need for Kitchen Sink Installation
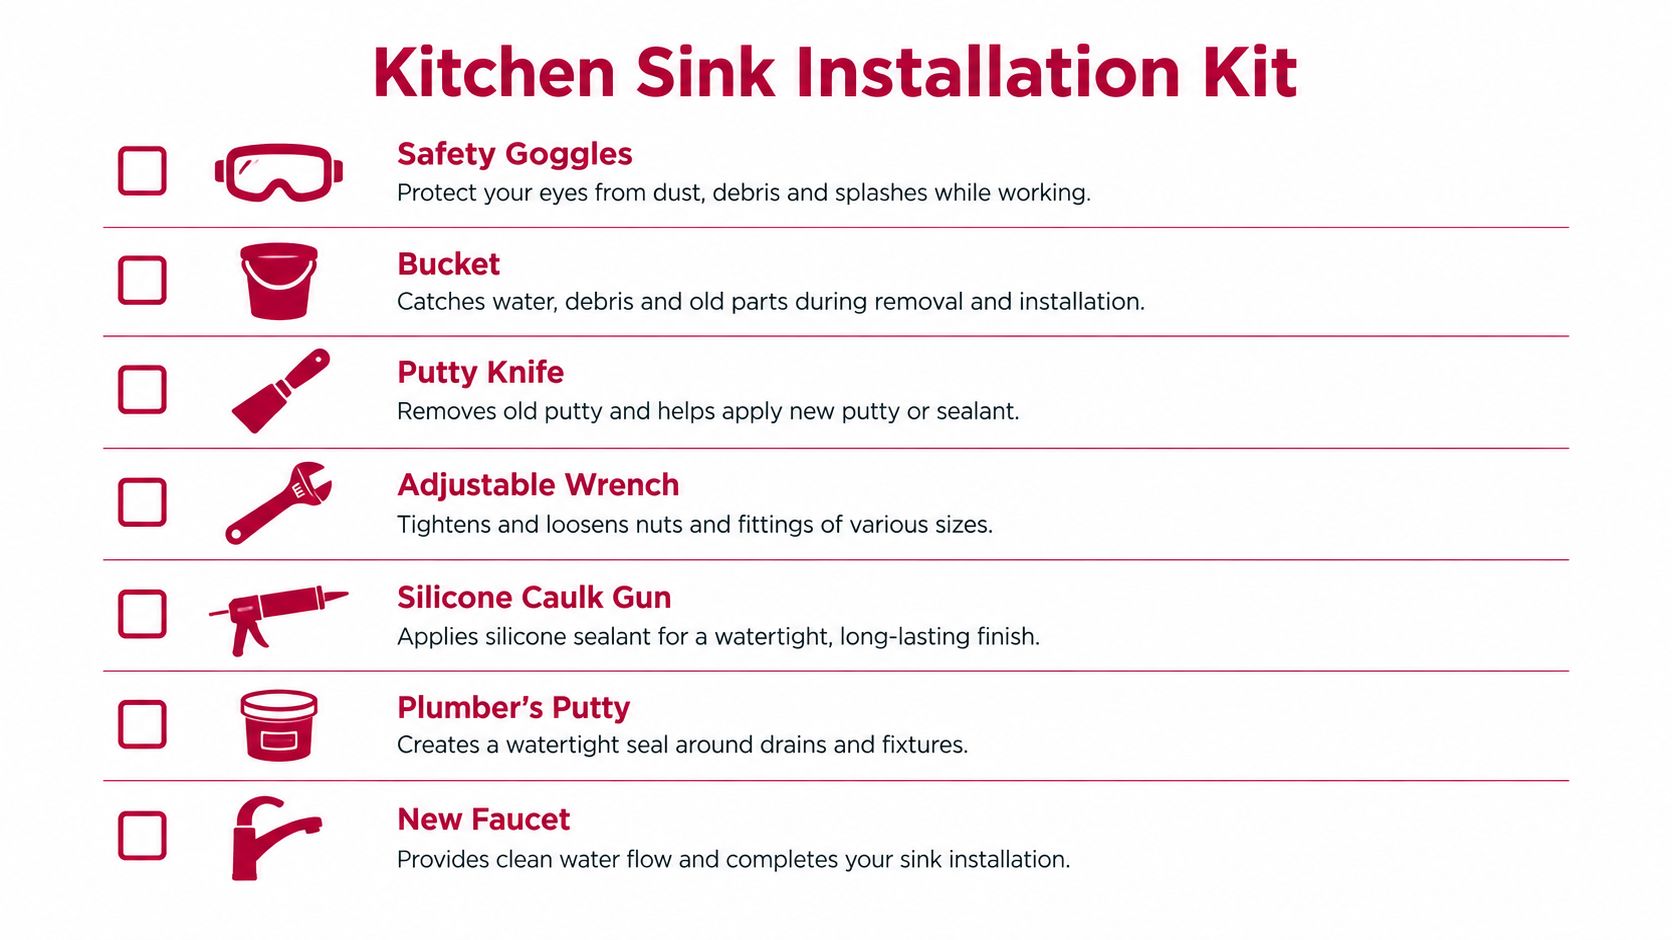
You need safety gear, measuring tools, hand tools, approved sealants, replacement drain parts, supply lines, and mounting hardware before disconnecting the old sink. Having the full kit ready prevents a half-disassembled cabinet from staying out of service while you make another trip for a washer or fitting.
Prepare the work area first
Keep safety glasses, gloves, a flashlight, towels, and a bucket within reach. The bucket catches residual water from the trap and supply connections, while towels protect the cabinet and make small leaks visible. A tape measure, pencil, putty knife, utility knife, and straightedge handle measuring and cleanup.
Use adjustable wrenches, adjustable pliers, a screwdriver, and a socket wrench where the mounting hardware requires it. A basin wrench is useful for faucet connections in a tight cabinet, but the exact tool depends on the faucet and access space.
Match each material to its job
Sink strainer: Covers the drain opening and connects the basin to the tailpiece.
Tailpiece: Carries water from the strainer to the trap.
P-trap: Holds a water seal and connects the tailpiece to the drainpipe.
Drainpipe and fittings: Adapt the trap outlet to the wall or floor connection.
Hot and cold supply lines: Connect the faucet to the shutoff valves.
Mounting clips or brackets: Hold the sink against the countertop or support structure.
Silicone sealant: Commonly seals a sink rim or undermount edge when the manufacturer specifies it.
Plumber's putty: Works with compatible drain assemblies when the fixture manufacturer permits it.
Replacement washers and slip nuts: Restore reliable compression at drain joints.
Faucet: Must match the sink's hole count and spacing, with its supply connections accessible below.
Silicone and plumber's putty aren't interchangeable by default. Use the sealing material named by the sink, strainer, faucet, or countertop manufacturer. Applying silicone beneath a drain flange that calls for putty, or using putty where a manufacturer prohibits it, creates an avoidable sealing problem.
If the installation requires drain relocation, water supply modifications, or replacement of a damaged shutoff valve, professional plumbing services can address the existing plumbing before the new sink is connected.
How Do You Install a Kitchen Sink Step by Step
To install a kitchen sink, shut off the water and power, remove the existing sink, prepare and verify the countertop opening, install the faucet and drain, secure and seal the new sink, connect the drain and water lines, and test every connection for leaks. Complete these steps in order so the sink is correctly positioned before the plumbing connections are finalized.

1. Shut off water and power
What to do: Close the hot and cold shutoff valves beneath the sink. Turn off the garbage disposal at its switch and breaker if disposal removal or electrical work is involved.
How to do it: Open the faucet to release pressure. Put a bucket under the trap and towels below the supply connections. A closed faucet handle does not prove that the valves are holding. Test the faucet and valves before disconnecting any line.
Check before continuing: Water should stop completely, and the disposal must not start accidentally. If a valve will not close or leaks around its stem, deal with that valve before removing the sink.
2. Remove the old sink and plumbing
Disconnect the supply lines, drain trap, dishwasher hose, disposal, and any accessory connected to the existing basin. Loosen supply-line coupling nuts with an adjustable wrench, then remove the P-trap slip nuts and lower the trap into the bucket.
For a drop-in sink, cut through the old seal around the rim with a utility knife, release the mounting clips, and lift the basin out. An undermount sink needs its clips, brackets, or support system removed before you separate it from the countertop. A farmhouse sink may also have cabinet framing or rails carrying its weight, so inspect the support before lifting.
Check before continuing: Confirm that no sprayer hose, disposal flange, or drain connection remains attached. If the sink will not lift, stop and look for a hidden clip, uncut seal, or connected pipe. Forcing it can damage the countertop or cabinet.
3. Clean and verify the countertop opening
Remove old sealant, debris, and loose material from the cutout and cabinet support surfaces. Scrape residue with a putty knife, then wipe the surfaces clean and dry.
Set the new sink in place without sealant when the design permits a dry fit. This check matters because sink styles do not tolerate the same errors. A drop-in sink must cover the opening with even rim contact. An undermount sink must sit at the planned reveal and remain fully supported from below. A farmhouse sink must align with the cabinet front and rest on a level support structure.
Check the finished position before making plumbing connections. Confirm that the sink is level, the rim covers the opening where required, the cabinet doors and drawers clear the bowl, and the drain outlet lines up reasonably with the existing waste route.
Use this fit table before securing the basin:
| Check Item | What to Verify | Why It Matters |
|---|---|---|
| Opening | Exact length, width, corner shape, and template | Prevents a loose rim or a sink that will not enter the cutout |
| Cabinet | Bowl depth, disposal clearance, and trap access | Prevents interference beneath the basin |
| Drain | Outlet position relative to the wall drain | Reduces forced bends and misaligned connections |
| Faucet | Hole count and 4-inch or 8-inch spacing | Ensures the faucet hardware fits the drilled layout |
| Support | Clips, brackets, cabinet rails, or approved supports | Keeps the basin from shifting after installation |
| Seal | Clean, dry, manufacturer-approved sealing surface | Prevents water from reaching the cabinet or countertop edge |
4. Install the faucet and drain components
Mount the faucet and install the strainer or drain assembly while the sink remains accessible. Follow the faucet's washer and mounting-hardware order. Feed the supply lines through the faucet hole, position the fixture, and tighten the mounting nut while keeping the faucet body from twisting.
Install the strainer with the approved plumber's putty or sealant, then fit the gasket and flange components from below. Connect the tailpiece to the strainer, but leave the P-trap loose until the sink is fixed in its final position.
Check before continuing: The faucet should sit straight, its handles should move freely, and the strainer flange should contact the drain opening evenly. For most residential kitchen sinks, the drain assembly and P-trap use 1-1/2-inch pipe, as summarized in this standard kitchen sink drain-size reference.
5. Align, support, secure, and seal the sink
Set the basin into its final position and complete the fit and seal before connecting the plumbing. Apply the manufacturer-specified bead to the countertop cutout or sink edge. Lower a drop-in sink gently, center it, and remove excess sealant.
Attach mounting clips evenly and tighten them gradually rather than pulling one side down at once. For an undermount sink, raise the basin into position, install the approved brackets or support system, and maintain consistent contact around the rim. Farmhouse sinks require cabinet support beneath the bowl and accurate apron alignment at the cabinet face.
Check before continuing: Confirm that the sink is centered, level, stable, fully supported, and sealed continuously. Inspect the rim from above and below where accessible. The drain must remain accessible, and the faucet should stay aligned as the mounting hardware tightens.
Practical rule: Connect the trap only after the basin is aligned and supported. The plumbing should follow the sink position, not pull the sink into position.
6. Connect the tailpiece and P-trap
Dry-fit the tailpiece, P-trap, and trap arm first. Connect the tailpiece to the trap, then connect the trap arm to the drainpipe. Keep the trap upright and the trap arm falling continuously toward the drain.
Start every slip nut by hand so the threads seat correctly. Tighten by hand, then make only a small additional turn with pliers or a wrench. Do not use the trap to force a wall drain into alignment. If the drain position has changed, use suitable fittings or have the waste route corrected properly.
Check before continuing: Washers must face the correct direction, threads must not be crossed, and the trap arm must have continuous fall. The kitchen rough-in reference describes the drain layout and connection conditions that need to be checked before final tightening, but local code and the actual fixture arrangement govern. U.S. references commonly identify a kitchen sink drain rough-in around 16 to 18 inches above the floor and at least 1-1/2-inch drain piping for a single-bowl sink.
7. Connect the hot and cold supply lines
Attach the faucet's hot and cold lines to the matching shutoff valves. Start each connection by hand so the threads seat correctly, then tighten with a wrench while holding the valve or faucet fitting steady. Keep the lines free of twists and sharp bends.
For a typical U.S. installation, supply stub-outs are commonly positioned 20 to 24 inches above the finished floor, with 23 inches commonly used, according to standard U.S. rough-in practice. Treat that as a rough-in reference, not a reason to bend a connection into place. Existing stub-outs that do not suit the new faucet or cabinet may need replacement.
Check before continuing: Each connection should be straight, secure, and accessible for service. Do not use thread tape on a compression connection unless the fitting manufacturer specifically requires it.
8. Open the valves and test every connection
Restore water slowly. Open the shutoff valves gradually, run both cold and hot water through the faucet, fill each basin, and release the water through the drain. Wipe every joint dry before testing, then watch the strainer, tailpiece, P-trap, trap arm, shutoff valves, and supply-line connections.
Operate the disposal only after its mechanical and electrical connections are complete. Run repeated fill-and-drain tests, because a joint may stay dry during a slow trickle but show moisture when the basin releases a larger flow.
Check before finishing: Look for active drips, dampness after draining, movement at the rim, water beneath the countertop edge, and slow drainage. The cabinet should remain dry, and the sink should not shift when the faucet is used.
Persistent slow flow or a blockage calls for a qualified drain-cleaning service rather than repeated tightening of fittings.
Why Is Your New Kitchen Sink Leaking and How Do You Fix It
A new kitchen sink usually leaks because the rim or strainer has a poor seal, a slip nut is loose, the tailpiece or trap arm is misaligned, or the drain has incorrect slope or vent geometry. Find the source before tightening anything, because a leak at one joint can run along the pipe and appear somewhere else.
Match the symptom to the repair
Find a kitchen sink leak by drying every connection and testing the sink while checking the rim, strainer, tailpiece, P-trap, trap arm, shutoff valves, and supply connections individually. Wipe every connection, run water into the basin, drain it, and use a dry paper towel around each joint. Water at the sink rim points to an incomplete silicone bead or an unseated gasket. Water beneath the strainer points to the flange seal, gasket, or retaining nut.
A drip at a slip joint usually means the washer is damaged, reversed, displaced, or not seated squarely. Loosen the joint, inspect the washer, realign the pipe, and retighten by hand followed by a modest wrench adjustment. Over-tightening can distort the washer or damage the fitting, so more force isn't a reliable fix.
Leak diagnosis: Dry the joint completely before testing. A dry paper towel often identifies the first leaking connection faster than visual inspection alone.
Check drainage behavior, not just visible water
If the sink drains slowly, inspect the P-trap and trap arm for a forced bend, standing water, or an obstructed path. Widely cited guidance calls for a trap-arm slope of about 1/4 inch per foot, and it warns that improper vent geometry contributes to slow drainage and trap seal loss, as outlined in this domestic kitchen sink code reference.
A tailpiece that is too long, a trap arm without continuous fall, or an island sink without the required above-floor vent return needs correction rather than extra sealant. Commercial or multi-basin setups may require 2-inch drains and an individual P-trap for each basin, so don't apply a single-bowl arrangement to a more complex fixture.
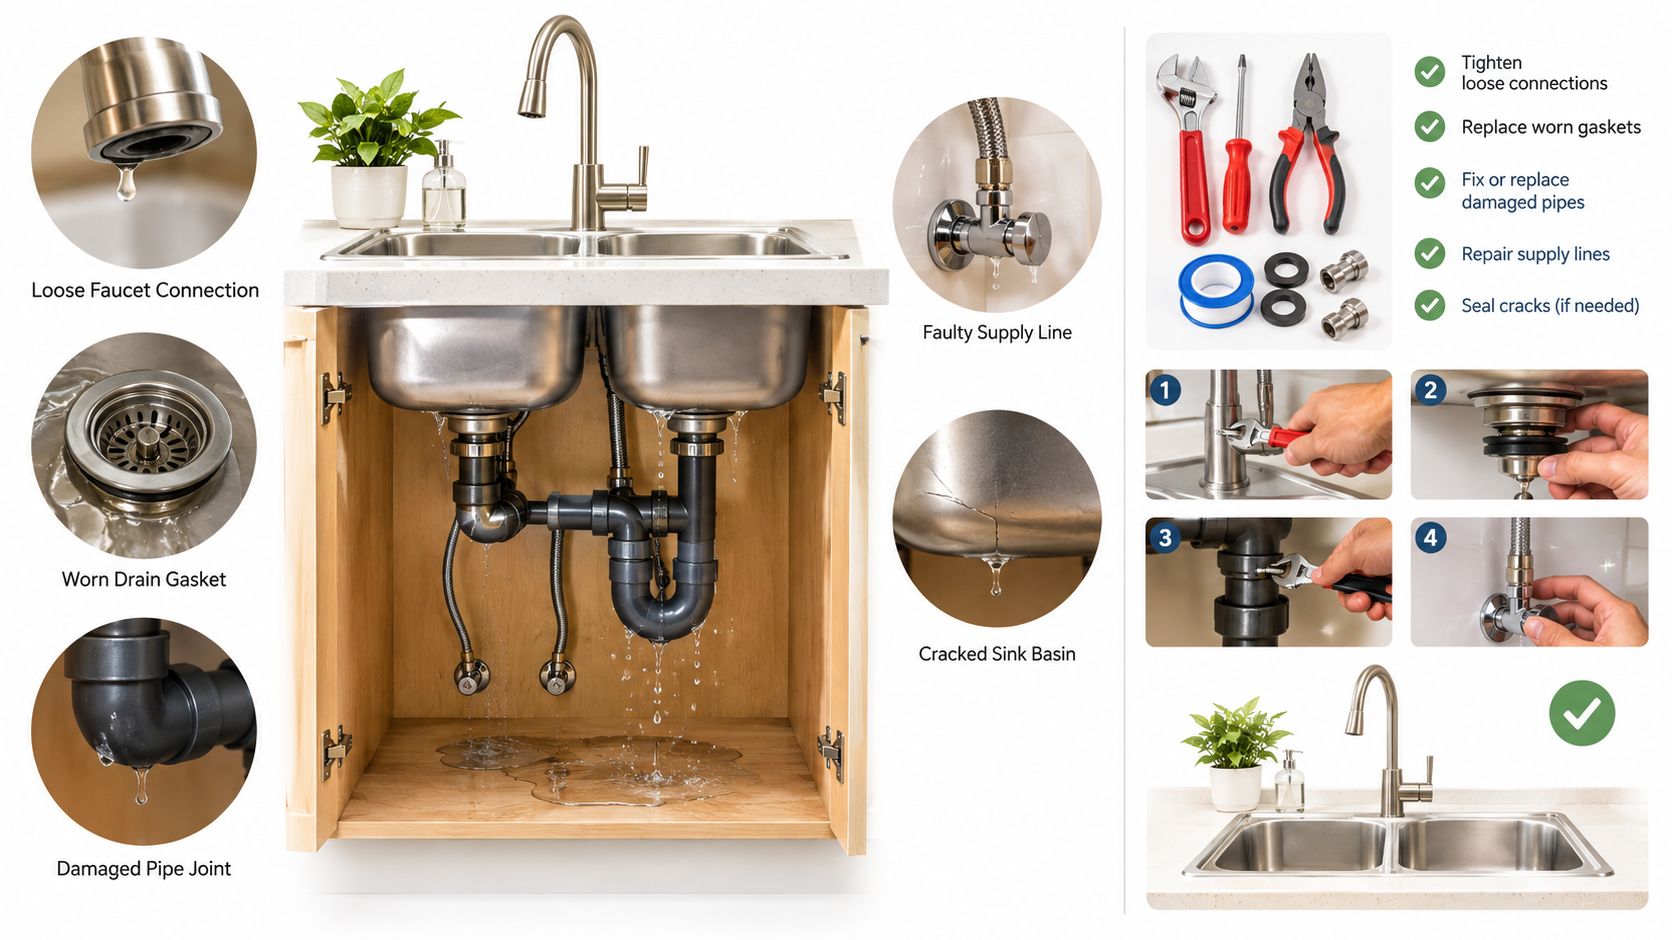
A leak that returns after replacing a washer, reseating the strainer, or realigning the trap usually indicates a damaged fitting, a countertop problem, or incorrect drain and vent routing. At that point, arrange professional plumbing repair instead of burying the problem under additional caulk.
When Should You Call a Licensed Plumber Instead of DIY
Call a licensed plumber when kitchen sink installation requires moving the drain or water supply lines, replacing damaged shutoff valves, correcting drainage or venting, or resolving an existing plumbing problem. Countertop modification, stone cutting, and specialized undermount or farmhouse support may also require the appropriate countertop or installation professional.
Call a licensed plumber or countertop specialist when the job changes the countertop opening, moves the drain, alters supply plumbing, requires stone or porcelain cutting, or involves an undermount or farmhouse sink that needs engineered support. Disposal and dishwasher integration also deserve careful coordination, especially when existing connections don't line up cleanly. Island sink venting, multi-basin drainage, damaged shutoff valves, and any suspected code issue should be handled by a qualified professional.
Avoid the common shortcuts: forcing the P-trap into alignment, tightening until a washer deforms, sealing with an unapproved material, cutting a countertop before confirming the exact template, or securing the sink before checking its level and support.
If the work involves an active leak or unsafe plumbing condition, use emergency plumbing coordination rather than leaving the cabinet exposed to water.
Need help with a kitchen sink installation? Submit your project details through WhatsDemand to connect with an independent local plumbing service provider. Before hiring, confirm the provider’s licensing and insurance requirements for your location and project.