

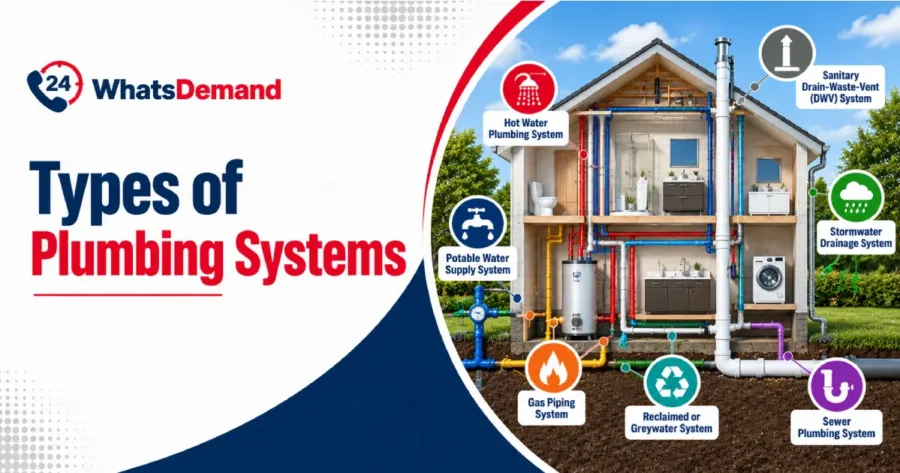
The types of plumbing systems include the potable water supply, hot water plumbing, and sanitary drain-waste-vent, each carrying a function that determines how a problem shows up and where it originates. Identifying which plumbing systems run through a property lets owners narrow down troubleshooting fast, because a rusty water taste points to the supply line, not a random guess-and-check.
Professionals benefit the same way on-site, tracing pipe runs, shutoff locations, and fixture connections against the existing layout before touching a wrench, which shortens diagnosis time and keeps professional plumbing repairs focused on the exact failed component within the plumbing system.
Need Help Diagnosing Your Plumbing System?
We’ll identify the issue and provide the right plumbing solution.
1. Potable (Drinking) Water Supply System
A potable (drinking) water supply system is a treatment that delivers safe water from a source to homes. Raw water undergoes coagulation, sedimentation, and filtration to remove turbidity and chlorination or ultraviolet disinfection.
The treatment kills pathogens and meets the EPA National Primary Drinking Water Regulations for contaminants (coliform bacteria). The water supply system includes the source, treatment plant, reservoir, distribution pipes, and booster pumps that maintain pressure.
2. Hot Water Plumbing System
A hot water plumbing system is a network that heats water for showers, sinks, and dishwashers. Cold water enters a tank-type or tankless water heater, gets heated by gas burners or electric elements, and travels through copper or PEX pipes to reduce heat.
A thermostatic mixing valve blends hot and cold water to achieve a safe temperature of around 120°F, meeting ASSE 1017 standards as per the Uniform Plumbing Code. The hot water plumbing has a temperature and pressure relief valve, a circulation pump, and insulated piping that maintains the water temperature.
3. Sanitary Drain-Waste-Vent (DWV) System
A sanitary Drain-Waste-Vent (DWV) System moves wastewater and sewer gases out of a building using waste stacks, vent stacks, and traps working together.
P-traps under sinks and toilets hold water to block sewer gas backflow, while vent stacks extend through the roof to equalize air pressure and prevent trap siphonage. Wastewater flows by gravity through the building sewer line into the municipal sanitary sewer main, a discharge point regulated under 40 CFR 122.41(e), which requires maintenance of permitted wastewater systems and facilities before treatment at a POTW.
4. Stormwater Drainage System
A stormwater drainage system collects rainwater from roofs, gutters, and surfaces, channeling it away from a building to prevent flooding and erosion. Downspouts connect to underground pipes, which route water toward catch basins or storm drains sized per local drainage codes.
Grated inlets and sump pumps handle low points where water pools, while backflow preventers stop storm surges from reversing into the system. Municipalities operating separate storm sewer systems, classified as MS4s, hold National Pollutant Discharge Elimination System (NPDES) permit coverage requiring a Stormwater Pollution Prevention Plan to control pollutant discharge into waterways.
5. Sewer Plumbing System
A sewer plumbing system is an underground pipe system that transports wastewater from a drain-waste-vent system to the sewer main or treatment facility. The building sewer connects at the property line through a wye fitting, runs at a minimum slope of 1/4-inch per foot for gravity flow, and requires cleanouts at intervals of not more than 100 feet for smaller lines.
Local POTWs operate the collection systems under NPDES permits issued by the EPA, which require them to properly operate treatment and control to prevent sanitary sewer overflows into waterways, making regular inspection of the sewer plumbing necessary to ensure compliance.
6. Gas Piping System
A gas piping system delivers natural gas or propane from the point of delivery to appliance connections throughout a building. Coverage begins where the point of delivery shall be the outlet of the service meter assembly.
The system operates within pressure limits set under NFPA 54, which applies to natural gas systems at pressures up to 125 PSI and LP-gas vapor systems up to 50 PSI. Every branch requires a gas shutoff valve upstream of appliances, where corrugated stainless steel tubing is used, a bonding jumper of at least 6 AWG copper wire connecting to a metallic pipe or CSST fitting for electrical grounding.
7. Reclaimed or Greywater Plumbing System
A reclaimed or greywater plumbing system is a dual-piping system that collects wastewater from showers, tubs, and lavatories, then filters and redistributes it for toilet flushing or irrigation, kept separate from the potable supply. A three-way valve routes greywater to the treatment train, followed by a “first flush” filter with a stainless-steel mesh basket to remove larger debris before the water reaches the holding tank.
The piping must run purple in color and be embossed, with the words “CAUTION: NONPOTABLE WATER” under most state plumbing codes, and a potable connection remains available for system downtime.
8. Rainwater Harvesting Plumbing System
Rainwater harvesting plumbing system diverts roof runoff through gutters into a storage tank for non-potable reuse in irrigation or toilet flushing. A first flush diverter routes the first flow of dirty runoff water from the roof away from the storage tank, installed between the downspouts, while leaf screens and roof washers strip debris before the water settles into an opaque tank that blocks light to prevent algae growth.
Piping falls under IPC Chapter 13 or CSA B805/ICC 805, and must be identified in accordance with the IPC, matching the purple-pipe labeling used in other rainwater harvesting.
9. Fire Sprinkler Plumbing System
A fire sprinkler plumbing system is a pressurized plumbing system under NFPA 13 that delivers water to sprinkler heads when heat triggers activation, suppressing fire before it spreads. Water enters through the system riser, where an alarm check valve fills a port with water when a fire sprinkler head activates, powering an alarm bell to the fire control panel. It is a listed indicating control valve that isolates each water source for maintenance.
Every riser assembly requires pressure gauges at the system main drain and on the sides of a pressure-reducing valve, a backflow preventer, hangers spaced per pipe size, and a fire department connection painted OSHA safety red, forming the backbone of a code-compliant fire sprinkler installation.
10. Irrigation and Outdoor Water Supply System
An irrigation and outdoor water supply system is a network of piping and outlets that delivers water to sprinklers and hose bibbs outside a building. The water supply connection to an irrigation system must be protected from contamination, since lawn irrigation systems rank among the most common unprotected cross-connections in residential water supply.
Each hose bibb or sillcock needs its own vacuum breaker of integral (ASSE 1019) or attached (ASSE 1011), while zone valves and a timer controller regulate flow to sprinkler heads, completing a code-compliant irrigation system.
11. Residential Plumbing System
A residential plumbing system has the water supply, drainage, and venting installed within a single-family or multi-family dwelling under the International Residential Code (IRC). Each dwelling unit must have a main shutoff valve near the entrance of the water service, a full-open type with provision for drainage, and the water heater. It requires a fully open valve installed in the cold-water supply pipe at or near the water heater.
Each fixture connects through its own shutoffs, because the code requires a shutoff valve, while the drain-waste-vent piping carries wastewater out through traps and branch drains.
12. Commercial Plumbing System
A commercial plumbing system is the water supply sized for higher occupancy loads in offices, restaurants, and institutional buildings.
Kitchens require a grease waste line, as a grease interceptor or automatic grease removal device is required to receive drainage from fixtures with grease-laden waste, including pot sinks, pre-rinse sinks, and dishwashers without pre-rinse sinks. Backflow preventers and multiple risers complete a commercial plumbing design.
13. Industrial Plumbing System
An industrial plumbing system is the process piping and wastewater network built for manufacturing plants and facilities, used to handle chemical, high-temperature, or high-volume discharge beyond standard domestic plumbing. Process piping falls under ASME B31.3, which governs weld qualification and pressure ratings for lines carrying corrosive or high-pressure fluids.
Wastewater discharge is regulated under 40 CFR Part 403, since facilities classified as Significant Industrial Users are prohibited from discharging pollutants that create a fire or explosion hazard, cause corrosive structural damage with a pH lower than 5.0, or obstruct flow with solid or viscous pollutants, requiring pretreatment before wastewater reaches a POTW.
14. Modern Smart Plumbing System
A modern smart plumbing system is a traditional water supply and drainage network upgraded with IoT sensors and app-based controls for real-time monitoring. A flow-based sensor installed at the main water line detects abnormal flow rates and triggers a motorized shutoff valve to close once a leak is confirmed.
Ultrasonic flow meters measure usage without cutting into pipes, as they work by transmitting sound waves into the main water line and recording the time delay, while paired temperature and humidity sensors flag freeze risk before pipes burst. A gateway module syncs the whole setup to a smartphone app, giving remote alerts, water-usage reports, and manual override control from anywhere.
What Is the Importance of a Plumbing System?
A plumbing system is important because it delivers safe water to a building, removes waste, and keeps the space sanitary and protected from water damage. Without it, a property has no clean water, no safe waste disposal, and no reliable way to control moisture.
For a home, the system supports daily life. It provides water for drinking, cooking, bathing, and laundry. It carries waste out and keeps sewer gases away from living areas. It also protects the structure. A well-kept system prevents leaks that cause mold, rot, and damaged floors and walls. Timely plumbing repair keeps small faults from becoming costly water damage.
For a commercial property, the system keeps the business running. Restaurants, offices, and clinics rely on a constant water supply and working drainage. A failure can close the doors and put customers and staff at risk. Commercial buildings must also meet health and safety codes. These cover grease interceptors, backflow prevention, and fire sprinklers. A sound plumbing system keeps the property compliant and avoids shutdowns.
How Do You Know What Type of Plumbing You Have?
To know what type of plumbing you have, follow the steps below.
- Find the main water line. Look where the water enters the home, near the meter or main shutoff valve.
- Check the supply pipe material. Copper is reddish-brown and rigid. PEX is flexible plastic in red, blue, or white. CPVC is rigid cream or off-white plastic. Galvanized steel is gray, threaded, and often rusty.
- Check the drain pipes. White or cream pipe is usually PVC. Black plastic pipe is usually ABS. Heavy, dark, rough pipe is cast iron.
- Identify the water source. A city meter means a municipal supply. A pump and pressure tank mean a private well.
- Identify the waste outlet. A sewer cleanout near the foundation points to a sewer connection. A buried tank and drain field point to a septic system.
- Check the water heater. Note whether it is a tank or tankless unit and whether it runs on gas or electricity.
- Look for gas lines. A black iron pipe or a yellow flexible connector at the appliances means the home has gas piping.
- Look for outdoor systems. Valve boxes in the lawn mean irrigation. Downspouts tied to underground pipes or a sump pump mean stormwater drainage.
How Does a Plumbing System Work in a House?
A plumbing system works in a house through two interconnected subsystems. The supply side, which pushes water in at 40-80 PSI through a line that splits between cold fixtures and the water heater, and the drainage side, which relies on gravity with pipes sloped 1/4 inch per foot to carry waste toward the sewer line.
A P-trap beneath each fixture holds standing water to block sewer gases, while vent stacks running through the roof admit air so wastewater flows without creating a vacuum lock. Standards in modern plumbing installations keep the pressurized systems separate except at the fixtures where they meet.
What Is the Difference Between Residential and Commercial Plumbing Systems?
Residential is a plumbing system sized for single-family homes, using smaller supply lines and a single service connection. Commercial is a higher-capacity system for restaurants, offices, and buildings with multiple risers..
Residential systems serve homes with standard fixture counts, while commercial systems require grease interceptors because fixtures in food preparation areas produce grease-laden waste, necessitating backflow preventers sized accordingly. The systems rely on the same supply-drainage-venting principles, but the scale of fixture units is where commercial plumbing vs. residential plumbing differ.
What Is the Difference Between a Water Supply System and a Drainage System?
A water supply system pushes potable water into a house at 40-80 PSI through supply pipes, while a drainage system relies on gravity, sloped 1/4 inch per foot, to carry wastewater out toward the sewer line.
The supply side uses smaller pipes (copper or PEX), while drainage uses larger pipes (PVC or cast iron) paired with vents and traps to keep sewer gases out. Poor slope or blocked venting on the drainage side is what causes drainage problems, including gurgling, slow flow, or backups.
What Is the Difference Between Hot and Cold Water Plumbing Systems?
A hot water plumbing system is a network that heats water via a tank or tankless heater before sending it through insulated pipes, while a cold water plumbing system runs straight from the main supply line without heating.
Hot lines use copper or PEX rated for heat and include a thermostatic mixing valve to keep output around 120°F, whereas cold lines need no temperature regulation at line pressure. Hot water pipes require insulation to reduce heat loss over distance, a step cold water piping does not need.
What Is the Difference Between Hot and Cold Water Plumbing Systems?
Yes, a house can have more than one type of plumbing system. Most homes have at least three: a potable water supply system, a sanitary drain-waste-vent system, and a stormwater drainage system. A water heater adds a hot water system on top of the cold supply. Larger or rural properties may also have gas piping, irrigation lines, a greywater setup, a private well, or a septic system. The systems run side by side and stay separate, except where they meet at the fixtures.
What Are the Different Kinds of Pipes in Plumbing?
The different kinds of pipes used in plumbing are listed below.
- Copper Pipe: Flexible tubing carries hot and cold potable water through soldered or press-fit joints.
- Cross-Linked Polyethylene (PEX Pipe): Flexible tubing snakes through wall cavities without soldering, using crimp or push-fit fittings.
- Chlorinated Polyvinyl Chloride (CPVC Pipe): Plastic piping withstands hot water distribution in solvent-welded joints.
- Polyvinyl Chloride (PVC Pipe): Plastic piping handles drain, waste, and vent lines under gravity flow.
- Acrylonitrile Butadiene Styrene (ABS Pipe): Black plastic piping carries drainage and vent lines in a single-solvent-cement system.
- Cast Iron Pipe: Heavy metal piping dampens noise in vertical soil stacks and underground sewer connections.
- Galvanized Steel Pipe: Zinc-coated steel piping, found in older homes, supplies water through threaded joints.
- Black Iron Pipe: Untreated steel piping distributes natural gas or propane to appliances and fixtures.
- Polypropylene Random Copolymer (PP-R Pipe): Heat-fused plastic piping delivers both hot and cold water in commercial installations.
- Corrugated Stainless Steel Tubing (CSST): Flexible metal tubing routes gas lines through framing with mechanical fittings instead of welds.
- High-Density Polyethylene (HDPE Pipe): Fused plastic piping transports water or gas underground with leak-resistant, jointless runs.
How Can You Maintain a Household Plumbing System?
You can maintain a household plumbing system through routine, targeted checks rather than waiting for visible failures. Flush the water heater tank annually to remove sediment buildup and check the anode rod, because a corroded rod thinner than half an inch coated in calcium shortens the unit’s lifespan.
Test water pressure with a hose-bib gauge to confirm it stays within 45 and 60 PSI, and clean faucet aerators with vinegar to clear mineral deposits before they restrict flow.
Can a House Have More Than One Type of Plumbing System?
Yes, a house can have more than one type of plumbing system running side by side. A home combines a potable water supply system, a sanitary DWV system, and a stormwater drainage system, with larger properties adding irrigation lines, gas piping, or a greywater setup for toilet flushing.
Do Modern Plumbing Systems Use Different Pipe Materials?
Yes, modern plumbing systems do use different pipe materials, matched by function rather than relying on one type throughout the house. Supply lines use PEX, drain lines use PVC or ABS, and gas lines use black iron or Corrugated Stainless Steel Tubing (CSST). Each material is suited to the pressure, temperature, or chemical demands of that specific line.
Are Plastic Plumbing Pipes Better Than Metal Pipes?
No, plastic plumbing pipes are not better than metal pipes. Plastic plumbing pipes and metal pipes each suit different applications. PEX and PVC resist corrosion and skip soldering since PEX pipes are highly flexible, allowing for easier installation in tight spaces, and require fewer fittings and connections, reducing the potential for leaks, while metal pipes (copper and brass) handle higher heat and pressure better.
Can a Plumbing System Last More Than 50 Years?
Yes, a plumbing system can last more than 50 years, depending on the material and water conditions. Cast iron drain lines last 75-100 years, and PVC and CPVC pipes last up to 100 years under conditions.
Thinner M-type copper pipes start leaking in as little as 20 years, so lifespan depends heavily on which material was installed.