

Changing washing machine hoses on a regular schedule is one of the simplest ways to prevent a major water leak in your home, since these hoses stay under constant water pressure and may cause flooding if they fail. Most washing machine manufacturers include specific guidance in the owner’s manual on when and how to replace the hoses for a specific model. Connection types and washer hose lengths vary between front-load and top-load machines, as well as between brands. This guide walks through removing old hoses, installing new ones, recognizing when replacement is overdue, and knowing when it’s worth calling in professional plumbing services instead of tackling it yourself.
Age matters even when a hose looks acceptable. An insurance-industry analysis of 525 washing machine claims found that about 55% of water-damage claims tied to washing machines involved leaking or burst supply hoses. The study reported that the average failed hose was 8.7 years old, more than half of failures occurred before 8 years, and nearly 80% happened before 10 years. Those findings support treating replacement as water-damage prevention, particularly as a rubber hose approaches the 5- to 10-year window. See the washing machine hose claim analysis for the underlying findings.
1. Turn Off the Water Supply
Turning off the water supply means locating the two shut-off valves behind the washing machine, one for hot and one for cold, and turning each clockwise until it stops. This step matters more than skipping it, as it prevents water pressure from spraying the moment it is loosened.
2. Unplug the Machine
Unplugging the machine means disconnecting it from its power outlet before doing any further work. This protects against electrical hazards if any water spills near the outlet or power cord during the hose removal, and it’s a step worth doing even if the water is already shut off.
3. Pull the Machine Out
Pulling the machine out means carefully sliding it away from the wall far enough to access the hose connections at the back. Move slowly and check that the power cord and hoses have enough slack to avoid straining or disconnecting unexpectedly as the machine moves.
4. Place a Bucket or Towel Underneath
Placing a bucket or towel underneath means positioning it below the hose connections before disconnecting anything. Even with the water supply off, some residual water remains trapped in the hoses and will drain out once they’re loosened, so this step keeps that water from spreading across the floor.
5. Loosen the Connections
Loosening the connections means using pliers or an adjustable wrench to turn the hose coupling nut counterclockwise at both the wall valve and the back of the machine. These fittings are often tightened firmly at installation, so it may take some steady pressure to get the first turn started.
6. Disconnect the Hoses
Disconnecting the hoses means fully unscrewing the coupling nuts and pulling the hoses free from both the wall valves and the machine’s water inlet ports. Expect a small amount of water to drain out as the hose separates, which is what the bucket or towel from step four is there to catch.
7. Remove Old Washers from the Hose Fittings
Removing the old washers means checking inside each connection point for the small rubber gasket that seals the fitting and pulling it out along with the old hose. These washers are usually replaced along with the hose itself, since a worn or flattened washer is a common cause of leaks even when the hose itself is in good condition.
8. Inspect the Connections
Inspecting the connections means checking the threads on both the wall valves and the machine’s water inlet ports for corrosion, mineral buildup, or damage before installing anything new. Clean threads and undamaged fittings make it far easier to get a tight, leak-free seal on the new hoses.
9. Check Hose Length and Routing Before Installation
Before attaching the new hoses, confirm that each one is long enough to reach comfortably without stretching, but not so long that it loops sharply or kinks behind the machine. A gentle curve is better than a tight bend, because kinks and tension can shorten hose life and make leaks more likely.
When Should You Replace Washing Machine Hoses?
Washing machine hoses should be replaced approximately every five years, even if they show no visible signs of wear, because most manufacturers recommend this interval as a preventive measure against age-related failure. Rubber hoses, in particular, degrade from the inside out under constant water pressure, so a hose can fail without any external warning signs. It is worthwhile to consult your specific washing machine’s manual, as some manufacturers recommend shorter intervals or specify reinforced hose types for their machines.
Common signs that replacement should happen sooner include:
- Cracks, bulges, blisters, or stiffness in the hose body
- Rust or corrosion around the metal fittings
- Repeated drips at the connection points
- Visible kinks or flattening behind the machine
- Hoses older than the recommended replacement window, even if they still look intact
What Do You Need to Replace Washing Machine Hoses?
The tools and materials needed to replace washing machine hoses are listed below.
- New washing machine hoses: Ideally braided stainless steel for durability
- Replacement rubber washers: One for each connection point
- Adjustable wrench or pliers: For loosening and tightening coupling nuts
- A bucket or towels: To catch residual water during the swap
- A flashlight: For checking connection threads in a dim space behind the machine
How Do You Install New Washing Machine Hoses?
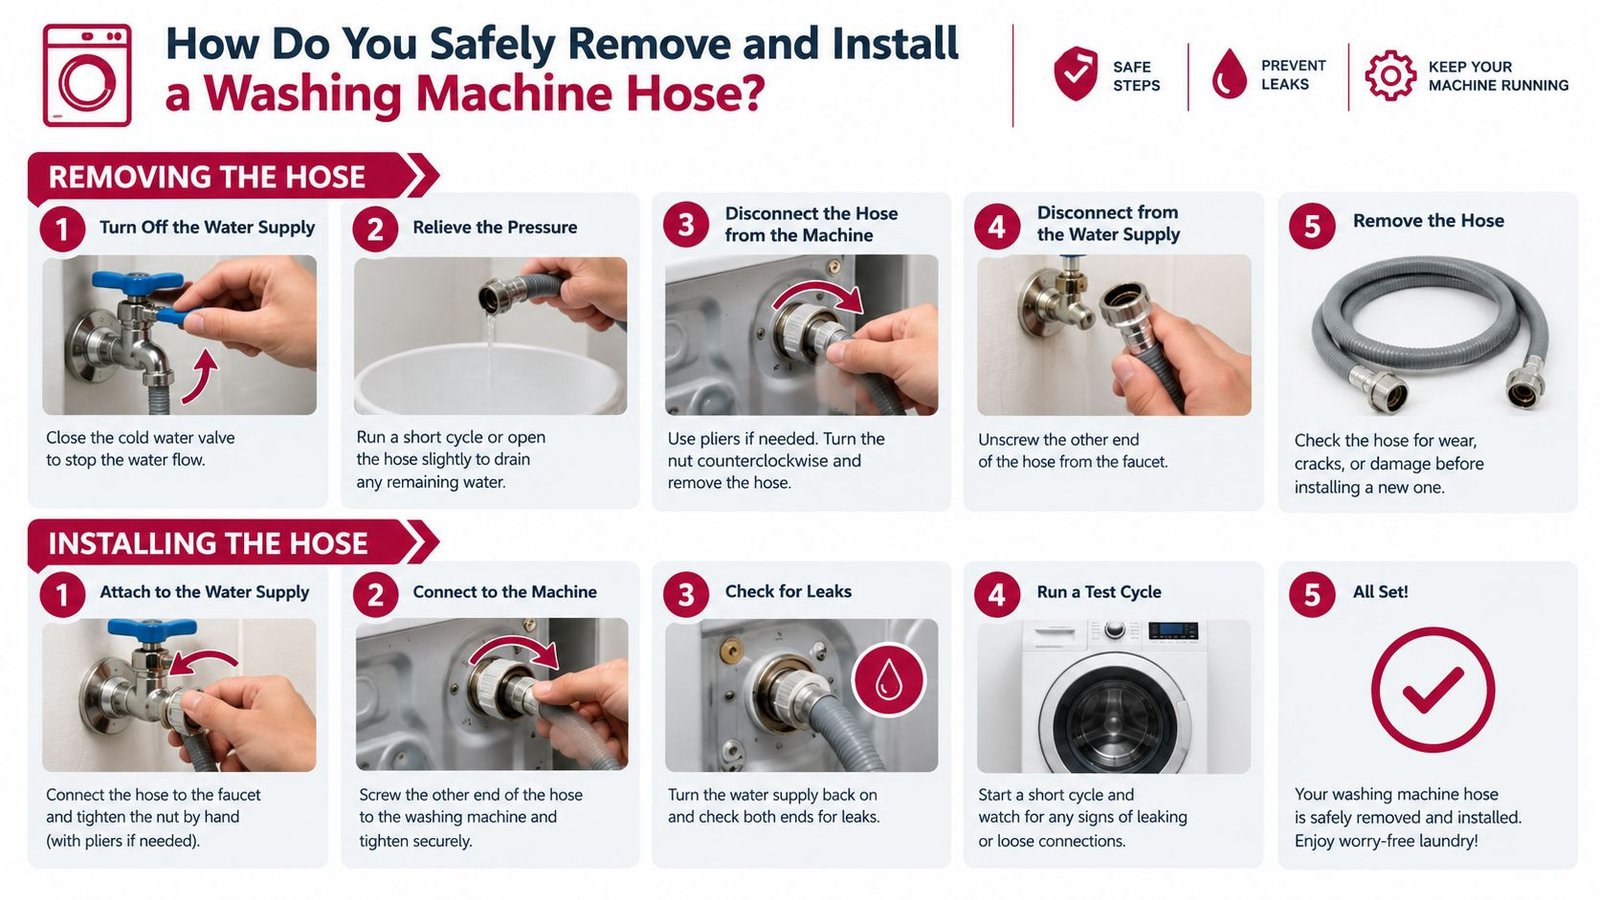
Installing new washing machine hoses is a simple step-by-step process. The goal is to connect the new hoses correctly, create a tight seal at each fitting, and test everything for leaks before moving the washer back into place.
Position the New Hoses
Lay the new hoses near the connection points and confirm which hose will connect to the hot water supply and which will connect to the cold water supply. Most washing machines label the inlet ports, which helps prevent crossing the lines.
Check That the Washers Are Seated Properly
Look inside each hose fitting to make sure the rubber washer sits flat and centered before attaching the hose. A washer that is twisted, pinched, or off-center is one of the most common causes of leaks after installation.
Connect the Hoses to the Washing Machine
Thread each hose onto its matching inlet port on the back of the washing machine. Start each connection by hand and tighten until snug to avoid cross-threading.
Connect the Hoses to the Water Supply Valves
Attach the other end of each hose to the matching wall valve, hot to hot and cold to cold. Hand-tighten each coupling nut first so the threads seat properly.
Tighten the Fittings
Use an adjustable wrench or pliers to tighten each coupling nut about a quarter turn to a half turn past hand-tight. Do not over-tighten, because too much force can damage the washer or crack the fitting.
Turn On the Water Supply
Slowly open both shut-off valves and watch each connection closely as water pressure returns to the hoses. If you see any dripping, shut the water off and retighten the fitting or reseat the washer.
Test the Washing Machine for Leaks
Run a short wash cycle with the machine still pulled slightly away from the wall. Watch the hose connections while the washer fills and drains, then check again after a few minutes to make sure no slow leak develops before pushing the machine back into place.
Push the Washer Back Carefully
After the test cycle, slide the machine back into position slowly and recheck the hoses as you do it. Make sure neither hose becomes pinched, twisted, or crushed against the wall, because that can create a leak even after a successful installation.
How to Test New Washing Machine Hoses for Leaks?
Testing new hoses for leaks means running a full wash cycle with the machine pulled out from the wall and watching every connection point on both the supply hoses and the drain hose during the fill, wash, and drain stages. Check again after a few minutes have passed, since some slow leaks only become visible once a connection has been under pressure for a while rather than immediately after tightening.
Identify the leaking hose
A supply-hose leak usually appears during filling, when the washer is idle, or around the back of the machine. Trace each line from the wall valve to the washer. The hot hose connects to the hot wall valve and the washer's hot inlet, while the cold hose connects to the cold valve and cold inlet. Labels on the machine or color markings on the valves help confirm which is which.
Check these locations with a flashlight:
- Wall-valve end: Look for dripping at the hose nut, corrosion on the valve threads, or moisture around the valve stem and packing nut.
- Machine-inlet end: Look for water at the inlet port, a loose nut, damaged threads, or a flattened washer.
- Hose body: Look for cracks, blisters, bulges, abrasion, stiffness, or a kink that keeps the hose under strain.
A drain-hose problem follows a different pattern. Water that appears mainly during the drain portion of the cycle points toward a cracked drain hose, a loose clamp, a poor standpipe connection, or a backed-up drain. The drain hose shouldn't be treated as interchangeable with either supply hose.
What if a new hose still leaks?
If a brand-new hose leaks, the cause is usually a misaligned washer, a cross-threaded connection, debris on the threads, or a fitting that was over-tightened. Turn the water off, disconnect the leaking end, inspect the washer, wipe the threads clean, and reconnect the hose by hand before tightening it again lightly with a wrench. If leaking continues after that, the valve or inlet port itself may be damaged rather than the hose.
Use age as a warning sign
Independent safety guidance commonly recommends replacing washing machine supply hoses every 3 to 5 years, even when there's no visible wear, as explained in washing machine hose inspection guidance. Another safety-focused recommendation advises replacing rubber hoses every 2 years, so guidance varies by hose material, installation conditions, and risk tolerance. The practical point is consistent. Don't rely on appearance alone.
A cracked hose requires replacement immediately. A hose with a bulge or blister has a weakened area, and corrosion around a fitting threatens the seal. If water comes from the valve body rather than the hose connection, the valve is the problem. That situation needs a different repair and often requires a plumber.
For help distinguishing a hose issue from a wider leak, a plumbing repair professional can inspect the supply valves, connections, and surrounding piping.
What Type of Washing Machine Hoses Should You Use?
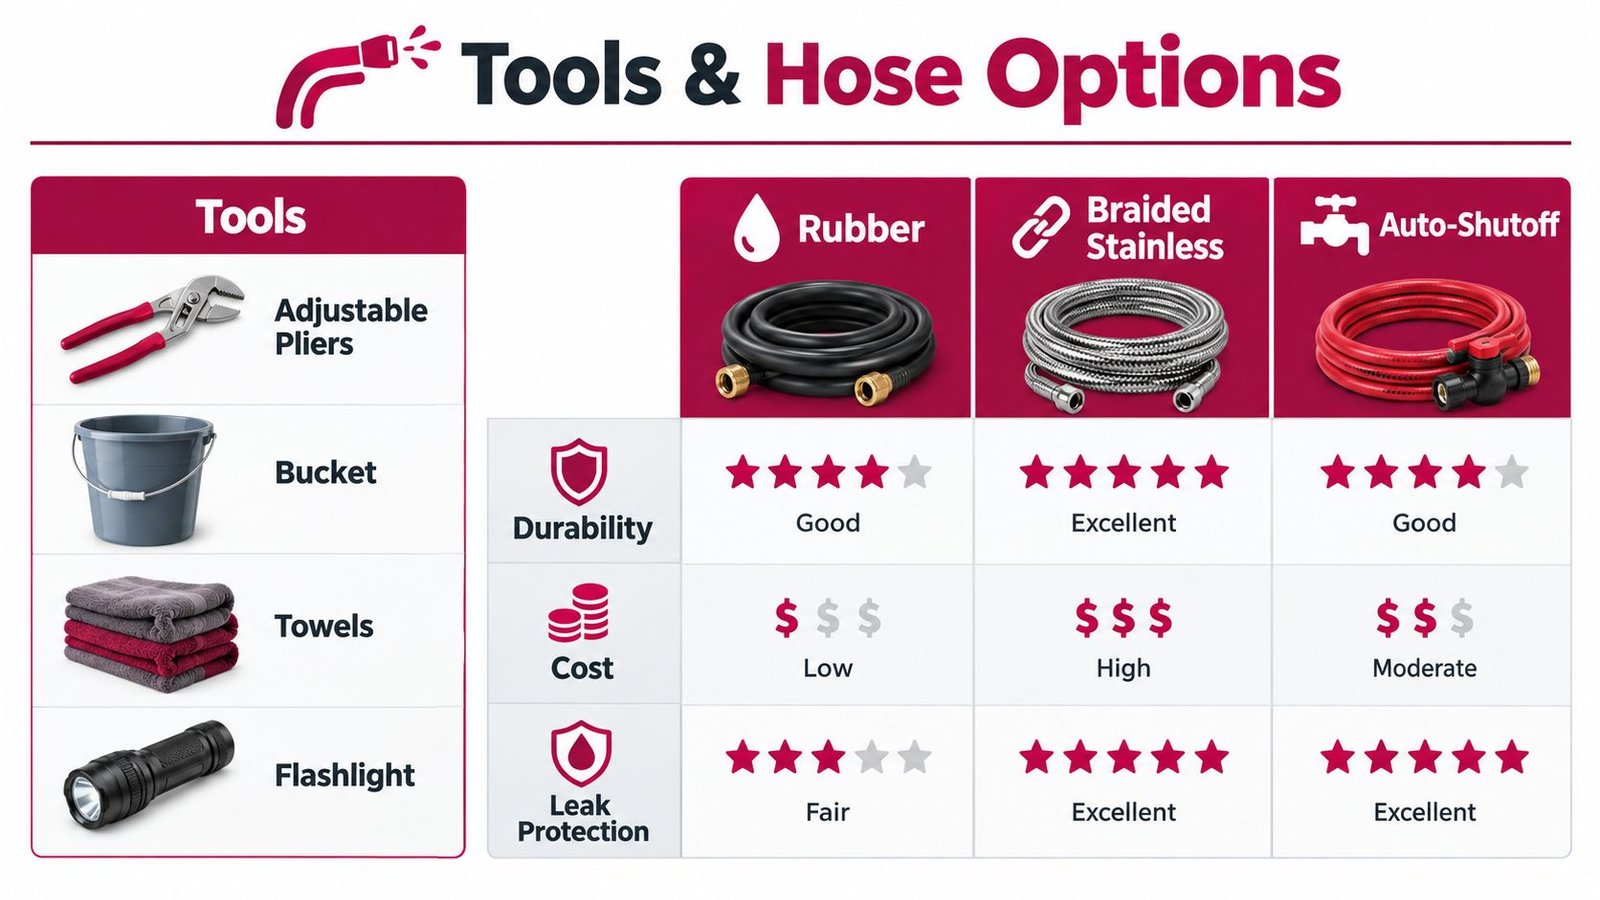
The types of washing machine hoses you can choose from are listed below.
- Rubber hoses: The most basic and least durable option, prone to cracking and bursting over time
- Braided stainless steel hoses: A reinforced option that resists bursting and is now the standard recommendation for most machines
- Reinforced polymer hoses: A lighter-weight alternative to steel braiding that still offers better durability than plain rubber
- No-burst or auto-shutoff hoses: Designed with a mechanism that stops water flow automatically if the hose fails, offering the highest level of leak protection
How long should washing machine hoses be?
Washing machine hoses should be long enough to reach the shut-off valves without tension, but short enough to avoid excessive looping behind the appliance. In many homes, standard supply hoses range from about 4 to 8 feet. The best fit is the shortest hose that still allows the washer to move slightly for service without pulling on the fittings.
Should you replace both hoses at the same time?
Yes, replacing both hot and cold supply hoses at the same time is usually the safer choice. If one hose has reached the end of its service life, the other is often the same age and exposed to the same conditions, so replacing both together reduces the chance of a second leak soon after the first repair.
What Should You Do If You Cannot Remove a Washing Machine Hose?
If a washing machine hose won’t come loose, apply a penetrating lubricant to the connection and let it sit for several minutes before trying again with a wrench or pliers for better grip. If the fitting still won’t turn, avoid forcing it excessively, since too much pressure can crack the valve or strip the threads. It’s a sign the fitting itself may be corroded or seized, and replacing washer hoses at that point often means also replacing the shut-off valve, which is worth handling carefully rather than forcing through.
What if the shut-off valve will not close completely?
If the shut-off valve keeps dripping or does not fully stop the water, do not proceed with the hose replacement until the water supply is controlled. A valve that will not close properly can turn a simple hose swap into an active leak. In that situation, shutting off the home’s main water supply and contacting a plumber is often the safest next step.
Are Washing Machine Water Hoses Universal?
Yes, most washing machine water supply hoses use a standard 3/4-inch garden-hose-style thread, which makes them compatible across the vast majority of residential washing machine brands and models. It’s still worth confirming your specific machine’s inlet port size before buying replacement hoses, since some models vary.
Are Washing Machine Drain Hoses Interchangeable?
Yes, in most cases, since drain hoses generally connect via a friction fit or hose clamp rather than a standardized threaded connection, making them broadly interchangeable across machines. Diameter can still vary between models, so checking your machine’s original drain hose size before purchasing a replacement is a good way to avoid a loose or leaky fit.
When Should You Hire a Professional for the Washer Hose Replacement?
A professional should be brought in for washer hose replacement when the shut-off valves themselves are corroded, stuck, or leaking, when the wall connection shows signs of a larger plumbing issue, or when you’re not confident working with water shut-offs in a tight space behind a heavy appliance. If you’re unsure whether the problem is isolated to the hose or points to something bigger, our guide on when to call a plumber breaks down the situations worth bringing in professional help for.
Other situations that justify professional help include:
- Repeated leaking after installing a new hose correctly
- Damaged inlet threads on the washing machine
- Old or seized shut-off valves that may break when turned
- Signs of mold, water damage, or hidden leaking behind the appliance
- Very tight laundry-room layouts where moving the machine safely is difficult
Preventive Maintenance Tips for Washing Machine Hoses
A few routine habits can help washing machine hoses last longer and reduce the chance of a sudden leak.
- Check the hoses visually every few months for bulges, cracks, rust, or damp spots
- Keep the washer far enough from the wall to prevent crushing the hoses
- Replace rubber washers whenever you install new hoses
- Avoid reusing very old hoses when moving to a new house or replacing the washer
- Consider turning off the washer supply valves when leaving home for extended periods
Common Mistakes to Avoid During Washer Hose Replacement
Even a straightforward hose replacement can cause leaks if a small detail is missed. The most common mistakes include:
- Forgetting to shut off both hot and cold valves
- Mixing up the hot and cold connections
- Installing a hose with the washer missing or crooked
- Cross-threading the coupling nut by starting it with a wrench instead of by hand
- Over-tightening the fittings
- Pushing the machine back so far that the new hoses kink or crush
- Ignoring slow drips during the test cycle
Final Thoughts
Replacing a washing machine hose is a manageable home maintenance task for many homeowners, but the small details matter. Using the right hose type, checking the washers, routing the lines properly, and testing carefully for leaks can make the difference between a quick upgrade and an expensive water-damage problem. If anything about the valves, threads, or leak source seems uncertain, bringing in a professional is often the safer and less costly decision.
This video shows the general replacement sequence and connection points: